Jay Taylor's notes
back to listing indexHow-To: Python Compare Two Images - PyImageSearch
[web search]
How-To: Python Compare Two Images

Would you have guessed that I’m a stamp collector?
Just kidding. I’m not.
But let’s play a little game of pretend.
Let’s pretend that we have a huge dataset of stamp images. And we want to take two arbitrary stamp images and compare them to determine if they are identical, or near identical in some way.
In general, we can accomplish this in two ways.
The first method is to use locality sensitive hashing, which I’ll cover in a later blog post.
The second method is to use algorithms such as Mean Squared Error (MSE) or the Structural Similarity Index (SSIM).
In this blog post I’ll show you how to use Python to compare two images using Mean Squared Error and Structural Similarity Index.
Looking for the source code to this post?
Jump right to the downloads section.
OpenCV and Python versions:
This example will run on Python 2.7/Python 3.4+ and OpenCV 2.4.X/OpenCV 3.0+.
Our Example Dataset
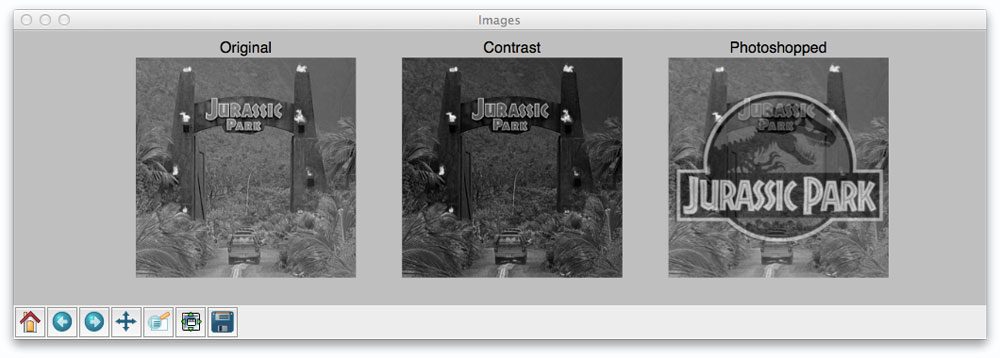
Let’s start off by taking a look at our example dataset:

Figure 1: Our example image dataset. Left: The original image. Middle: The original image with contrast adjustments. Right: The original image with Photoshopped overlay.
Here you can see that we have three images: (left) our original image of our friends from Jurassic Park going on their first (and only) tour, (middle) the original image with contrast adjustments applied to it, and (right), the original image with the Jurassic Park logo overlaid on top of it via Photoshop manipulation.
Now, it’s clear to us that the left and the middle images are more “similar” to each other — the one in the middle is just like the first one, only it is “darker”.
But as we’ll find out, Mean Squared Error will actually say the Photoshopped image is more similar to the original than the middle image with contrast adjustments. Pretty weird, right?
Mean Squared Error vs. Structural Similarity Measure
Let’s take a look at the Mean Squared error equation:

While this equation may look complex, I promise you it’s not.
And to demonstrate this you, I’m going to convert this equation to a Python function:
|
1 2 3 4 5 6 7 8 9 10 |
def mse(imageA, imageB): # the 'Mean Squared Error' between the two images is the # sum of the squared difference between the two images; # NOTE: the two images must have the same dimension err = np.sum((imageA.astype("float") - imageB.astype("float")) ** 2) err /= float(imageA.shape[0] * imageA.shape[1]) # return the MSE, the lower the error, the more "similar" # the two images are return err |
So there you have it — Mean Squared Error in only four lines of Python code once you take out the comments.
Let’s tear it apart and see what’s going on:
- On Line 7 we define our
msefunction, which takes two arguments:imageAandimageB(i.e. the images we want to compare for similarity). - All the real work is handled on Line 11. First we convert the images from unsigned 8-bit integers to floating point, that way we don’t run into any problems with modulus operations “wrapping around”. We then take the difference between the images by subtracting the pixel intensities. Next up, we square these difference (hence mean squared error, and finally sum them up.
- Line 12 handles the mean of the Mean Squared Error. All we are doing is dividing our sum of squares by the total number of pixels in the image.
- Finally, we return our MSE to the caller one Line 16.
MSE is dead simple to implement — but when using it for similarity, we can run into problems. The main one being that large distances between pixel intensities do not necessarily mean the contents of the images are dramatically different. I’ll provide some proof for that statement later in this post, but in the meantime, take my word for it.
It’s important to note that a value of 0 for MSE indicates perfect similarity. A value greater than one implies less similarity and will continue to grow as the average difference between pixel intensities increases as well.
In order to remedy some of the issues associated with MSE for image comparison, we have the Structural Similarity Index, developed by Wang et al.:

The SSIM method is clearly more involved than the MSE method, but the gist is that SSIM attempts to model the perceived change in the structural information of the image, whereas MSE is actually estimating the perceived errors. There is a subtle difference between the two, but the results are dramatic.
Furthermore, the equation in Equation 2 is used to compare two windows (i.e. small sub-samples) rather than the entire image as in MSE. Doing this leads to a more robust approach that is able to account for changes in the structure of the image, rather than just the perceived change.
The parameters to Equation 2 include the (x, y) location of the N x N window in each image, the mean of the pixel intensities in the x and y direction, the variance of intensities in the x and y direction, along with the covariance.
Unlike MSE, the SSIM value can vary between -1 and 1, where 1 indicates perfect similarity.
Luckily, as you’ll see, we don’t have to implement this method by hand since scikit-image already has an implementation ready for us.
Let’s go ahead and jump into some code.
How-To: Compare Two Images Using Python
|
1 2 3 4 5 |
# import the necessary packages from skimage.measure import structural_similarity as ssim import matplotlib.pyplot as plt import numpy as np import cv2 |
We start by importing the packages we’ll need — matplotlib for plotting, NumPy for numerical processing, and cv2 for our OpenCV bindings. Our Structural Similarity Index method is already implemented for us by scikit-image, so we’ll just use their implementation.
|
7 8 9 10 11 12 13 14 15 16 17 18 19 20 21 22 23 24 25 26 27 28 29 30 31 32 33 34 35 36 37 38 39 |
def mse(imageA, imageB): # the 'Mean Squared Error' between the two images is the # sum of the squared difference between the two images; # NOTE: the two images must have the same dimension err = np.sum((imageA.astype("float") - imageB.astype("float")) ** 2) err /= float(imageA.shape[0] * imageA.shape[1]) # return the MSE, the lower the error, the more "similar" # the two images are return err def compare_images(imageA, imageB, title): # compute the mean squared error and structural similarity # index for the images m = mse(imageA, imageB) s = ssim(imageA, imageB) # setup the figure fig = plt.figure(title) plt.suptitle("MSE: %.2f, SSIM: %.2f" % (m, s)) # show first image ax = fig.add_subplot(1, 2, 1) plt.imshow(imageA, cmap = plt.cm.gray) plt.axis("off") # show the second image ax = fig.add_subplot(1, 2, 2) plt.imshow(imageB, cmap = plt.cm.gray) plt.axis("off") # show the images plt.show() |
Lines 7-16 define our mse method, which you are already familiar with.
We then define the compare_images function on Line 18 which we’ll use to compare two images using both MSE and SSIM. The mse function takes three arguments: imageA and imageB, which are the two images we are going to compare, and then the title of our figure.
We then compute the MSE and SSIM between the two images on Lines 21 and 22.
Lines 25-39 handle some simple matplotlib plotting. We simply display the MSE and SSIM associated with the two images we are comparing.
|
41 42 43 44 45 46 47 48 49 50 |
# load the images -- the original, the original + contrast, # and the original + photoshop original = cv2.imread("images/jp_gates_original.png") contrast = cv2.imread("images/jp_gates_contrast.png") shopped = cv2.imread("images/jp_gates_photoshopped.png") # convert the images to grayscale original = cv2.cvtColor(original, cv2.COLOR_BGR2GRAY) contrast = cv2.cvtColor(contrast, cv2.COLOR_BGR2GRAY) shopped = cv2.cvtColor(shopped, cv2.COLOR_BGR2GRAY) |
Lines 43-45 handle loading our images off disk using OpenCV. We’ll be using our original image (Line 43), our contrast adjusted image (Line 44), and our Photoshopped image with the Jurassic Park logo overlaid (Line 45).
We then convert our images to grayscale on Lines 48-50.
|
52 53 54 55 56 57 58 59 60 61 62 63 64 65 66 67 68 69 70 |
# initialize the figure fig = plt.figure("Images") images = ("Original", original), ("Contrast", contrast), ("Photoshopped", shopped) # loop over the images for (i, (name, image)) in enumerate(images): # show the image ax = fig.add_subplot(1, 3, i + 1) ax.set_title(name) plt.imshow(image, cmap = plt.cm.gray) plt.axis("off") # show the figure plt.show() # compare the images compare_images(original, original, "Original vs. Original") compare_images(original, contrast, "Original vs. Contrast") compare_images(original, shopped, "Original vs. Photoshopped") |
Now that our images are loaded off disk, let’s show them. On Lines 52-65 we simply generate a matplotlib figure, loop over our images one-by-one, and add them to our plot. Our plot is then displayed to us on Line 65.
Finally, we can compare our images together using the compare_images function on Lines 68-70.
We can execute our script by issuing the following command:
|
1 |
$ python compare.py |
Results
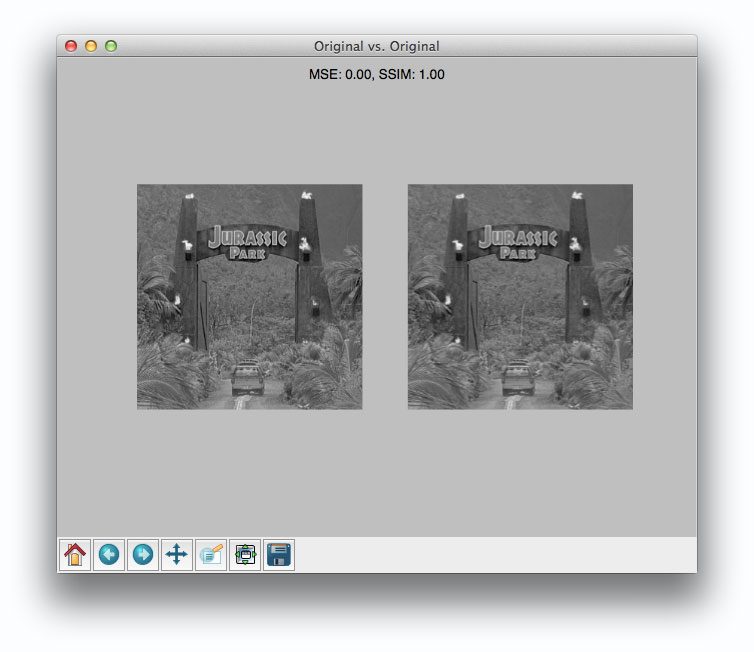
Once our script has executed, we should first see our test case — comparing the original image to itself:

Not surpassingly, the original image is identical to itself, with a value of 0.0 for MSE and 1.0 for SSIM. Remember, as the MSE increases the images are less similar, as opposed to the SSIM where smaller values indicate less similarity.
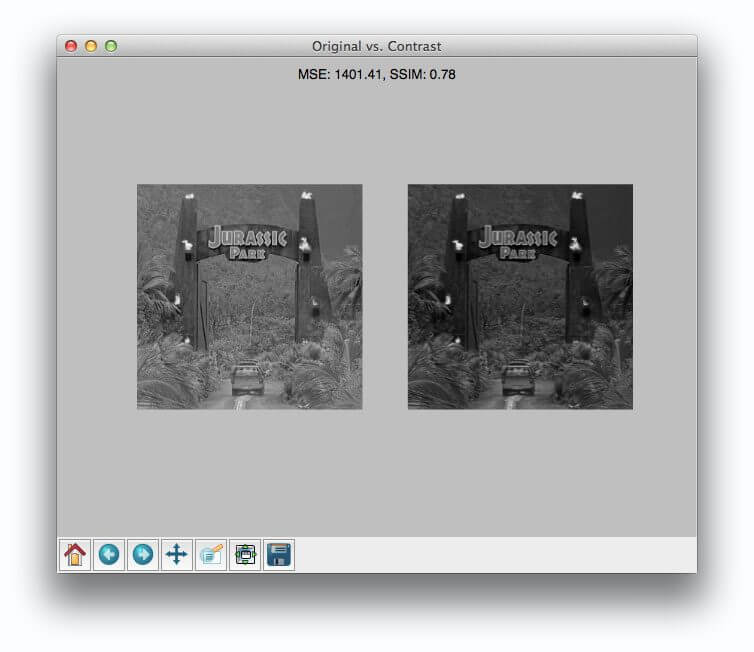
Now, take a look at comparing the original to the contrast adjusted image:

In this case, the MSE has increased and the SSIM decreased, implying that the images are less similar. This is indeed true — adjusting the contrast has definitely “damaged” the representation of the image.
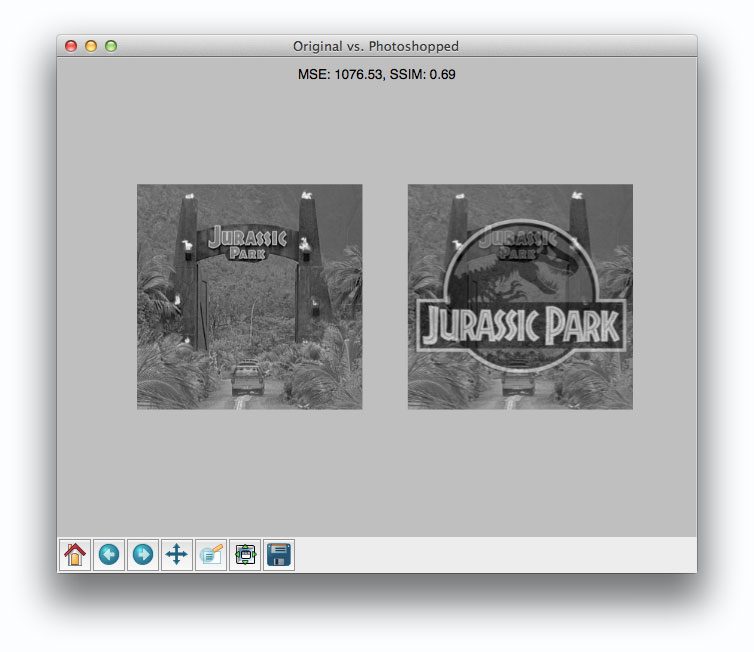
But things don’t get interesting until we compare the original image to the Photoshopped overlay:

Comparing the original image to the Photoshop overlay yields a MSE of 1076 and a SSIM of 0.69.
Wait a second.
A MSE of 1076 is smaller than the previous of 1401. But clearly the Photoshopped overlay is dramatically more different than simply adjusting the contrast! But again, this is a limitation we must accept when utilizing raw pixel intensities globally.
On the other end, SSIM is returns a value of 0.69, which is indeed less than the 0.78 obtained when comparing the original image to the contrast adjusted image.
Summary
In this blog post I showed you how to compare two images using Python.
To perform our comparison, we made use of the Mean Squared Error (MSE) and the Structural Similarity Index (SSIM) functions.
While the MSE is substantially faster to compute, it has the major drawback of (1) being applied globally and (2) only estimating the perceived errors of the image.
On the other hand, SSIM, while slower, is able to perceive the change in structural information of the image by comparing local regions of the image instead of globally.
So which method should you use?
It depends.
In general, SSIM will give you better results, but you’ll lose a bit of performance.
But in my opinion, the gain in accuracy is well worth it.
Definitely give both MSE and SSIM a shot and see for yourself!
Downloads:
 If you would like to download the code and images used in this post, please enter your email address in the form below. Not only will you get a .zip of the code, I’ll also send you a FREE 11-page Resource Guide on Computer Vision and Image Search Engines, including exclusive techniques that I don’t post on this blog! Sound good? If so, enter your email address and I’ll send you the code immediately!
Email address:
Resource Guide (it’s totally free).

45 Responses to How-To: Python Compare Two Images
-
Good day Adrian, I am trying to do a program that will search for an Image B within an Image A. I’m able to do with C# but it takes about 6seconds to detect image B in A and report its coordinates.
Please can you help me?
-
Hi Xavier. I think you might want to take a look at template matching to do this. I did a guest post over at Machine Learning Mastery on how to do this.
-
-
Marvellous! It’s in a very good way to describe and teach. Thanks for the great work.
Next step, would it be possible to mark the difference between the 2 pictures?
Below is a simple way, but I am much looking forward to see an advance one. Thanks.
from PIL import Image
from PIL import ImageChops
from PIL import ImageDrawimageA= Image.open(“Original.jpg”)
imageB= Image.open(“Editted.jpg”)dif = ImageChops.difference(imageB, imageA).getbbox()
draw = ImageDraw.Draw(imageB)
draw.rectangle(dif)
imageB.show() -
Hello dear Doctor Rosebrock,
Many thanks for your reply, and guidance.
I googled and I can only find some examples involved cv2.subtract for other purposes but not marking differences between 2 pictures.
You have November and December posts using cv2.subtract but newbie like me just don’t get how to make it work to mark difference.
Would you mind give an example, if you have time? Thanks.
-
Hi Adrian,
I need to compare 2 images under a masked region. Can you help me with that? I mean how to i extend this code to work for a subregion of the images. Also i do a lot of video processing, like comparing whether 2 videos are equal or whether the videos have any artifacts. I would like to make it automated. Any posts on that?
-
Hi Mridula. If you’re comparing 2 masked regions, you’re probably better off using a feature based approach by extracting features from the 2 masked regions. However, if your 2 masked regions have the same dimensions or aspect ratios, you might be able to get away with SSIM or MSE. And if you’re interested in comparing two images/frames to see if they are identical, I would utilize image hashing.
-
-
Thanks for this. I’ve inadvertently duplicated some of my personal photos and I wanted a quick way to de-duplicate my photos *and* a good entry project to start playing with computer vision concepts and techniques. And this is a perfect little project.
-
Hi Weston, I’m glad the article helped. You should also take a look at my post on image hashing.
-
-
Hi,
I am trying to evaluate the segmentation performance between segmented image and ground truth in binary image. In this case, which metric is suitable to compare?
Thank you.
-
That’s a great question. In reality, there are a lot of different methods that you could use to evaluate your segmentation. However, I would let your overall choice be defined by what others are using in the literature. Personally, I have not had to evaluate segmentation algorithms analytically before, so I would start by reading segmentation survey papers such as these and seeing what metrics others are using.
-
-
-
Hey Timothy, if you want to compare images of different sizes using MSE and SSIM, just resize them to the same size, ignoring the aspect ratio. Otherwise, you may want to look at some more advanced techniques to compare images, like using color histograms.
-
-
Hi Adrian,
That was a very informative post and well explained. I have it working with png images, do you know if it’s possible to compare dicom images using the same method?
I have tried using the pydicom package but have not had any success.
Any help or advice would be greatly appreciated!
-
Thank you for this great post. I am wondering how post about locality sensitive hashing is advancing?
-
Hey Primoz, thanks for the comment. Locality Sensitive Hashing is a great topic, I’ll add it to my queue of ideas to write about. My favorite LSH methods use random projections to construct randomly separating hyperplanes. Then, for each hyperplane, a hash is constructed based on which “side” the feature lies on. These binary tests can be compiled into a hash. It’s a neat, super efficient trick that tends to perform well in the real-world. I’ll be sure to do a post about it in the future!
-
-
Hi Adrian, I have tried a lot to install skimage library for python 2.7. but it seems there is a problem with the installations. am not able to get any help. is there anyother possible package that could help regarding the same? I am actually trying to implement GLCM and Haralick features for finding out texture parameters. Also, is there any other site that can help regarding the Skimage library problem??
-
Installing scikit-image can be done using pip:
$ pip install -U scikit-imageYou can read about the installation process on this page. You weren’t specific about what error message you were getting, so I would suggest starting by following their detailed instructions. From there, you should consider opening a “GitHub Issue” if you think your error message is unique to your setup.
Finally, if you want to extract Haralick features, I would suggest using mahotas.
-
-
Hi Adrian,
I am working on a project in which i need to compare the two videos and give an out put with the difference between the reference video and the actual converted video. And this white process needs to be automated..
Any input on this.
Thanks in advance-
If you’re looking for the simple difference between the two images, then the
cv2.absdifffunction will accomplish this for you. I demonstrate how to use it in this post on motion detection.
-
-
hi adrian…..I am working on a project in which i need to compare the image already stored with the person in the live streaming and i want to check whether those persons are same.
Thanks in advance-
That’s a pretty challenging, but doable problem. How are you comparing the people? By their faces? Their profile? Their entire body? Face identification would be the most reliable form of identification. In the case that people are allowed to enter and leave the frame (and change their clothing), you’re going to have an extremely hard time solving this problem.
-
-
Got it, so you’re looking for face identification algorithms. There are many popular face identification algorithms, including LBPs and Eigenfaces. I cover both inside the PyImageSearch Gurus course.
-
-
-
-
I want to compare an object captured from live streaming video with already stored image of the object.But i cant find the correct code for executing this.please help me
-
Hey Anu, you might want to take a look at Practical Python and OpenCV. Inside the book I detail how to build a system that can recognize the covers of books using keypoint detection, local invariant descriptors, and keypoint matching. This would be a good start for your project.
Other approaches you should look into include HOG + Linear SVM and template matching.
-
-
Hi Adrian, read your article and is quite helpful in what I am trying to achieve. Actually I am implementing algorithm for converting grayscale image to colored one based on the given grayscale image and an almost similar colored image. I have implemented it and now want to see how close is the resulting image to the given colored image. I have gone through your article and implemented what you have given here.
1. Is there any other method to do so for colored images or will the same methods (MSE, SSIM and Locality Sensitive Hashing) work fine?
2. Also, I read the paper related to SSIM in which it was written that SSIM works for grayscale images only. Is it really so?-
SSIM is normally only applied to a single channel at a time. Traditionally, this normally means grayscale images. However, in both the case of MSE and SSIM just split the image into its respective Red, Green, and Blue channels, apply the metric, and then take the sum the errors/accuracy. This can be a proxy accuracy for the colorization of your image.
-
-
How can I compare stored image and capturing image as per the pixel to pixel comparison for open CV python for the Raspberry Pi
-
You can use this code — but you’ll need to adapt it so that you’re reading frames from your video stream
-
-
Hi,
Very useful article, for a beginner like me.
I want to compare two “JPG” images captured pi cam, and in result give a bit to GPIO
images are stored in Pi SD card.
please help
thanks.-
There are various algorithms you can use to compare two images. I’ve detailed MSE and SSIM in this blog post. You could also compare images based on their color (histograms, moments), texture (LBPs, textons, Haralick), or even shape (Hu moments, Zernike moments). There is also keypoint matching methods which I discuss inside Practical Python and OpenCV. As for passing the result bit to the GPIO, be sure to read this blog post where I demonstrate how to use GPIO + OpenCV together. Next week’s blog post will also discuss this same topic.
-
-
Hi Adrian,
I am working in photgrammetry and 3D reconstruction.When the user clicks a point in the first image,i want that point to be automatically to be detected in the second image without the user selecting the point in the second image as it leads to large errors.How can this be done,i have tried cropping the portion around the point and trying to match it through brute force matcher and ORB.However it detects no points.
Please suggest a technique!!
I can solve for the point mathematically but i want to use image processing to get the point.


Leave a Reply
Name (required)
Email (will not be published) (required)
Website
Resource Guide (it’s totally free).
Click the button below to get my free 11-page Image Search Engine Resource Guide PDF. Uncover exclusive techniques that I don't publish on this blog and start building image search engines of your own.
You can detect faces in images & video.
Are you interested in detecting faces in images & video? But tired of Googling for tutorials that never work? Then let me help! I guarantee that my new book will turn you into a face detection ninja by the end of this weekend. Click here to give it a shot yourself.
PyImageSearch Gurus: NOW ENROLLING!
Hello! I’m Adrian Rosebrock.
I'm an entrepreneur and Ph.D who has launched two successful image search engines, ID My Pill and Chic Engine. I'm here to share my tips, tricks, and hacks I've learned along the way.
Learn computer vision in a single weekend.
Want to learn computer vision & OpenCV? I can teach you in a single weekend. I know. It sounds crazy, but it’s no joke. My new book is your guaranteed, quick-start guide to becoming an OpenCV Ninja. So why not give it a try? Click here to become a computer vision ninja.
Subscribe via RSS
-
Install OpenCV and Python on your Raspberry Pi 2 and B+
February 23, 2015
-
Home surveillance and motion detection with the Raspberry Pi, Python, OpenCV, and Dropbox
June 1, 2015
-
How to install OpenCV 3 on Raspbian Jessie
October 26, 2015
-
Install OpenCV 3.0 and Python 2.7+ on Ubuntu
June 22, 2015
-
Install OpenCV 3.0 and Python 2.7+ on OSX
June 15, 2015
-
Basic motion detection and tracking with Python and OpenCV
May 25, 2015
-
Accessing the Raspberry Pi Camera with OpenCV and Python
March 30, 2015