Jay Taylor's notes
back to listing indexDJI Mavic Pro: The Missing Handbook: Wifi/Remote Only, Tap to Fly, Fixed Wing, Point of Interest, Attitude Indicator
[web search]
Original source (syonyk.blogspot.com)
Clipped on: 2018-04-13
Electric bikes, batteries, low energy transport, sustainability, testing the testers, and more! New posts every Saturday evening.
Saturday, August 5, 2017
DJI Mavic Pro: The Missing Handbook: Wifi/Remote Only, Tap to Fly, Fixed Wing, Point of Interest, Attitude Indicator
The 5th week of my "Mavic Pro Missing Handbook" series focuses on the remaining flight modes ("Tap to Fly", "Fixed Wing", "Point of Interest"), discusses the attitude/orientation/power indicator, and covers flying without a phone or without a remote. I finish with a few random observations that don't fit well in other places.
 Other than a bit of sunburn on the Mavic Pro, everything is flying smoothly and you should find plenty useful in this week's post!
Other than a bit of sunburn on the Mavic Pro, everything is flying smoothly and you should find plenty useful in this week's post!Mavic Pro Missing Handbook
What is this series of posts? This is my attempt to provide a comprehensive look at all the various features of the Mavic Pro - in text form. I find video tutorials to be generally lacking in actual content, as well as truly frustrating to skim (you have to suffer through 10 minutes to find out that, no, it doesn't actually talk about what you were wanting to learn).
I'll be updating this list with more posts as I write them. My blog updates every Saturday.
DJI Mavic Pro: The Missing Handbook: Basic Operations Preflight checks, gimbal locks, takeoff, landing, basic flight operations.
DJI Mavic Pro: The Missing Handbook: Intelligent Flight Modes Tripod, Cinematic, and Sport Modes. Terrain Follow. Home Lock. Course Lock. Pretty much everything that requires you to still move the sticks to move it.
DJI Mavic Pro: The Missing Handbook: Waypoints In depth coverage of the various waypoints modes supported in the DJI Go app, as well as how to use DJI's Ground Station Pro for more advanced waypoints features.
DJI Mavic Pro: The Missing Handbook: Active Track, Follow Me Mode, and Gesture Mode Active Track has quite a few modes of operation, and I delve into all of them. This post also covers the GPS-based "Follow Me Mode" and how to look less silly using Gesture Mode for dronies.
DJI Mavic Pro: The Missing Handbook: Comprehensive List of Menu Options A list of all the menu options and camera menu options with notes on what they do, when you should change them, and how to use them for effective flying.
Flying With Phone Only - WiFi Mode
One of the features the Mavic Pro supports is flying in WiFi mode with just a phone as the controller. The Mavic Pro becomes a wireless access point, you join a phone to it, run the DJI Go app, and fly without the remote. This is a terrible idea when you have the controller, for a variety of reasons, and you shouldn't use it. However, I am attempting to completely cover the features offered...
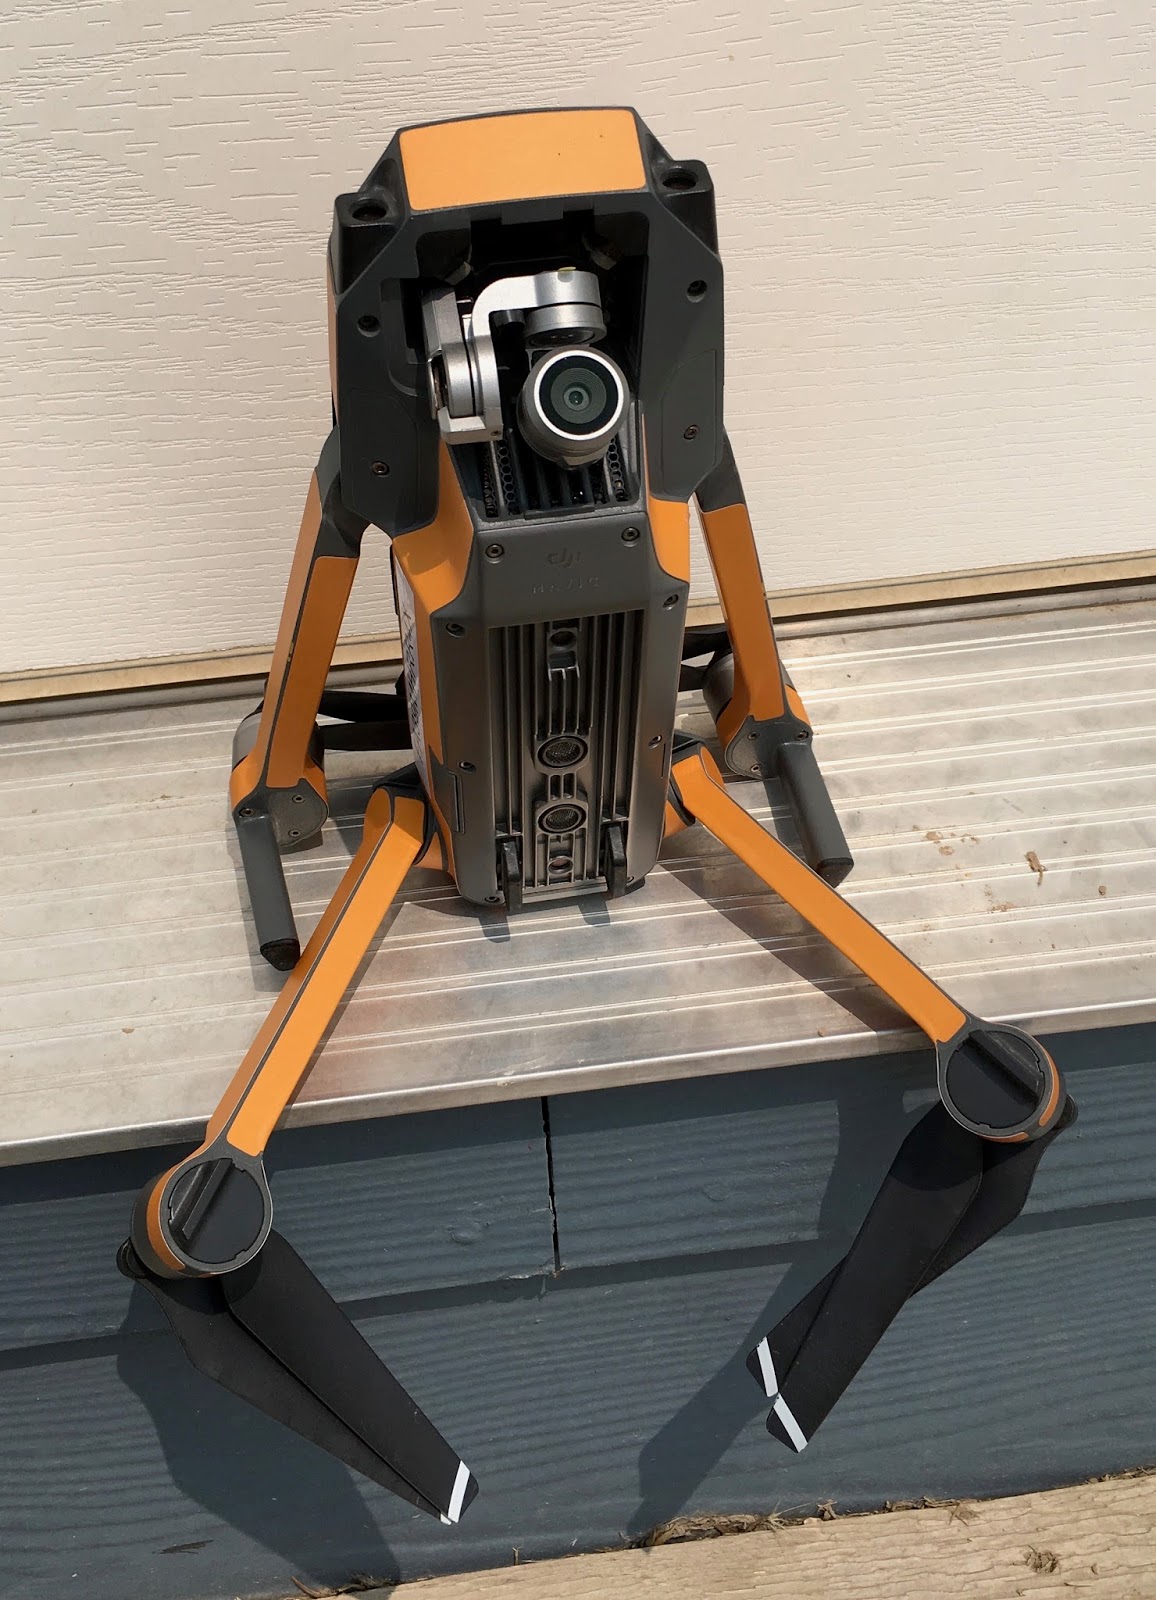
The Mavic Pro is normally in "RC" mode - configured to talk to the Remote Control. To use WiFi mode, toggle the physical switch under one of the side covers (the one with the SD card). There are two positions, and the WiFi one, obviously, enables WiFi mode. If you're in WiFi mode, the remote control cannot connect. You fly with your phone only with the switch toggled!
 Power the Mavic Pro on, go into your phone wireless settings, and wait for it to show up. There's a wireless key and you can find it either in the battery compartment or on the back of a front leg. This connection doesn't have internet, so depending on your phone, you may have to let it know that, yes, you're aware that there's no internet, and it should remain connected. Some phones are pretty aggressive about dropping wireless connections if they don't think there's an internet connection, and that's obviously a bad idea in the middle of a flight. There should be a helpful popup when you open the DJI Go app about how to use the joysticks.
Power the Mavic Pro on, go into your phone wireless settings, and wait for it to show up. There's a wireless key and you can find it either in the battery compartment or on the back of a front leg. This connection doesn't have internet, so depending on your phone, you may have to let it know that, yes, you're aware that there's no internet, and it should remain connected. Some phones are pretty aggressive about dropping wireless connections if they don't think there's an internet connection, and that's obviously a bad idea in the middle of a flight. There should be a helpful popup when you open the DJI Go app about how to use the joysticks.
Once paired, you should see the normal video feed and status bar in the app. Flying is done with your fingers on the screen and "virtual joysticks." If you don't see the virtual joysticks indicated (two thin white circles on the screen), check the directional pad icon in the lower left corner - if it's grey, tap it to enable the joysticks.

To take off, you must use the "Takeoff" button - there's no other way to take off. Trying to do the "both sticks down and center" motion with the virtual joysticks won't turn the motors on. Be sure your home point is properly set, and I would highly suggest a precision takeoff to give the Mavic Pro the best odds of handling a disconnected controller sanely. Check your return to home height too.
Once in the air, the virtual joysticks work the same as the normal joysticks - in the default mode, the left stick controls elevation and yaw, and the right stick controls translation. They'll show the direction of deflection under your fingers as you slide around.

A few other modes are supported - Active Track, Gesture Mode (for taking "dronies"), and Tap to Fly. They work the same as with the remote, except that the virtual joysticks won't pop up in these modes, so there's no way to override what the computer is doing. Good luck!

Landing is done the same way you do it with the joysticks, and landing manually works (hover over the landing spot, pull the altitude stick all the way down, and it will shut down after landing).
Now, with all that said, there is no reason to use this mode. Only a few of the flight modes are supported, the control precision is worse, there's no map option, and there are a lot more things that can go wrong. An 802.11 link is quite vulnerable to poor link quality from other access points, or even other 2.4/5GHz devices in the area. The normal RC link is a great wireless jammer because it will talk over other devices and not wait for a quiet period - which is great for link reliability. This isn't true of the WiFi link. Plus, if the app crashes, or your phone switches away from the app for a phone call or such, you have no control of the drone - and "Smart RTH" isn't something I particularly trust. If you're in a rural area, you could fly like this, but... why? The remote is a much better and much more reliable way to control the Mavic Pro.
If you have a Spark? Well, I feel sorry for you if you're flying it purely with your phone. Good luck!
Flying With Remote Only
It is possible to fly the Mavic Pro with the remote only (no phone connected). However, it's quite limited, and I'm not sure why you'd want to do this - the gimbal tilt works, but you can't frame a shot, can't check focus, and can't fly very far - and I've not worked out the incantation to actually take a photo, either (the photo button doesn't seem to work).
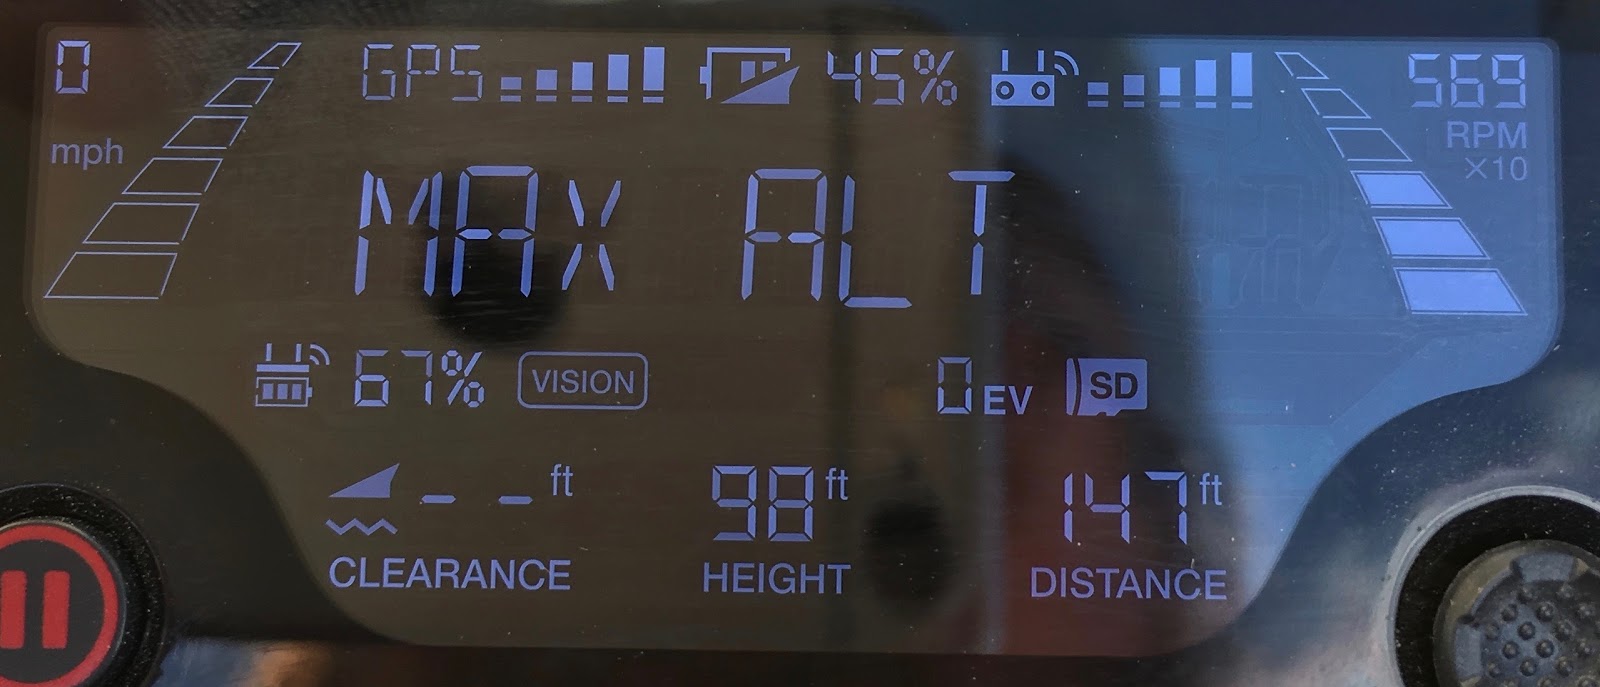
As of the 01.03.0800 Mavic Pro firmware, the following restriction shows up:
For increased safety, the flight is restricted to a height of 30 m and distance of 50 m when not connected or logged into the app during flight, including DJI GO 4 and all apps compatible with DJI aircraft.
This means that you can fly to a maximum of 100' above the home point, and a radius of 150' away from the home point. How does the home point get set without a phone or tablet connected? Well, it's the takeoff point - or the GPS acquired point. If you take off without a GPS lock in Atti or Opti mode, the home point will be recorded when the Mavic Pro gets a good signal. If you're over 150' away when it records this home point, start walking, because it won't be able to fly back to you.

If you hit the maximum altitude or radius, the tail LED will start flashing alternating red and green to indicate you've hit the limit, and the controller will inform you of this as well.

Without the phone, you still get obstacle detection, but that's about it.
Another situation in which you might find yourself doing "remote only" flying is if your phone dies while flying. Battery dies, the cable disconnects, the app crashes, whatever. In this situation, the flight has been authenticated with the phone for the start, so the Mavic Pro doesn't have any limits. If you're in visual range and have been flying manually, it shouldn't be hard to fly back without the video feed (and if you can't, might I offer that you've been pushing the limits of "visual range" a bit?). If you're not sure how it's oriented (perhaps your phone died during a waypoint mission and you don't recall the exact details of the final settings), the Return to Home button is a good one to use. You did ensure that the Home Point and RTH altitude were correctly set when you took off, right?
Fixed Wing Mode
Also for the sake of completeness, I'm covering "Fixed Wing Mode." This is a mode that seems to have been included mostly for the DJI Goggles users, because I'm struggling to figure out the point without those in the picture.
Fixed Wing Mode changes how the Mavic Pro flies and handles the video. Once you're moving forward, enabling Fixed Wing Mode sets the speed you're traveling as your new forward velocity. The altitude control stick will cause you to climb and descend, the translation stick becomes an "accelerate or disable" stick (push forward to accelerate, pull back to disable this mode), and either a left/right translation movement or a yaw movement will turn the Mavic Pro (there's no difference between the two ways of turning).
During this mode, the video feed will tilt if you turn so it sort of simulates how a fixed wing aircraft turns, but the Mavic Pro doesn't actually tilt. It's synthetic bank done with the gimbal.
If you want to play around with it, you'll need to enable it under the remote control menu. It's not in the Intelligent Flight Modes menu, or the main flight modes menu - it's hiding under the remote control options ("Johnny 5, with antennas"). Toggle this to the right to enable it, and prepare to be confused!

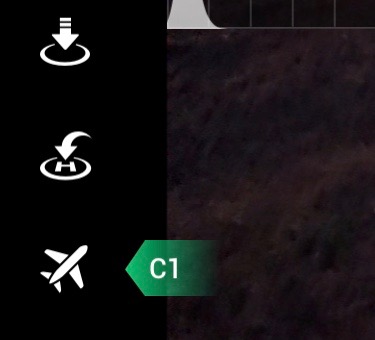
Once you enable it, the C1 and C2 buttons will switch to Fixed Wing Mode buttons if you're moving forward (they still perform the otherwise specified actions when stationary). Once you start moving forward, you'll see the icons on the left change - the bottom icon becomes an airplane with a "C1" prompt. When you see this, you can either tap that icon or use the C1 button (left underside button) to enable Fixed Wing Mode. Once you do that, turn left and right with either stick, climb and descend, or add speed if you feel like it by pushing forward on the translation stick (normally the right one). You can't slow down. The C2 button will exit this mode when you rather rapidly get bored with it.

I can think of a few interesting shots one might be able to get with this mode - flying down a canyon might be interesting, though line of sight limitations (both for legality and remote control signal) would limit how much you can do. Maybe flying over a canyon? I can't think of much I'd use it for other than pretending the Mavic Pro is something it isn't.
And, worst of all, it flies nothing like an actual fixed wing aircraft - because it isn't one. I've flown (and crashed) fixed wing RC, I fly full sized fixed wing (172s and 182s), and this has nothing in common with either. Maybe it's cool with the goggles. That's about all I can come up with.
Tap to Fly
Tap to Fly, as far as I'm concerned, is one of those features that sounds really good on the spec sheet, and is a great way to have your drone do something entirely unintended in practice. On paper, this lets you tap the phone screen, and the drone will just go "that way" until you tell it to do something different. The problem is, "that way" is somewhat vaguely defined - and it it will just keep on going until you tell it different.
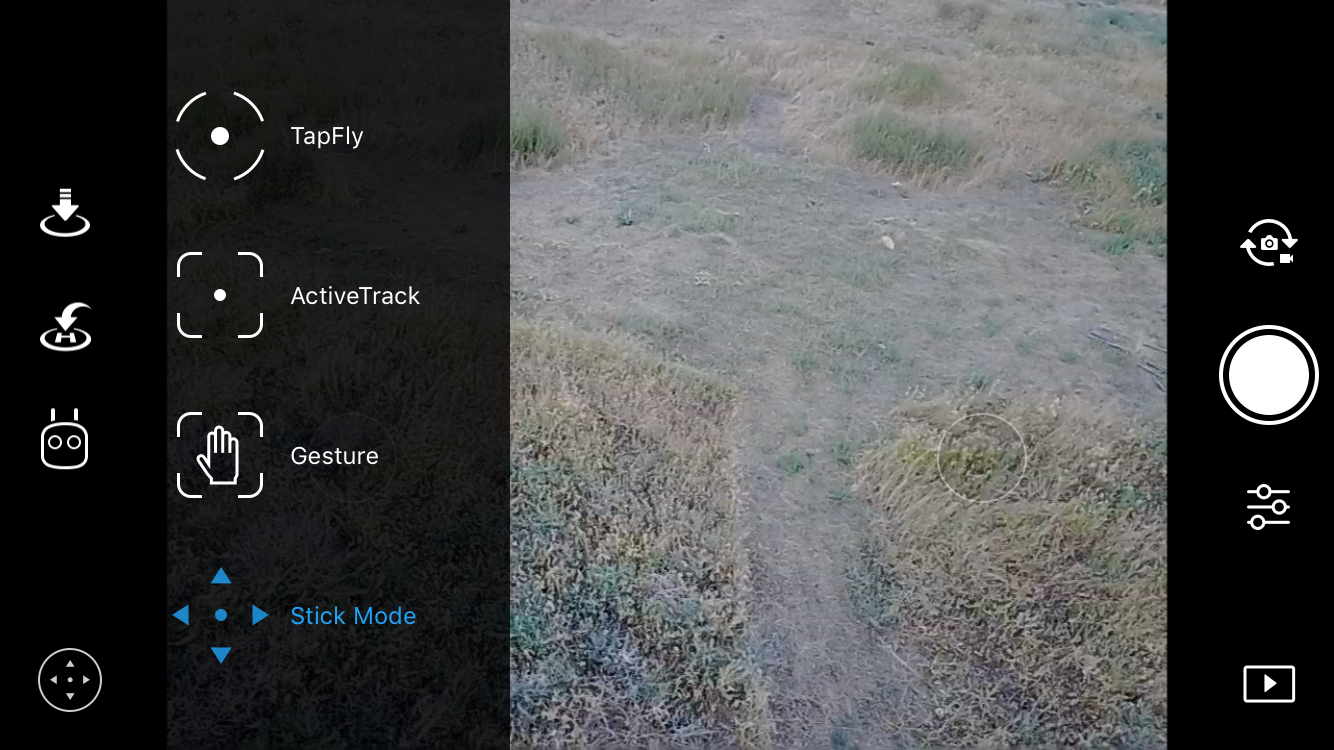
Entering it is done the same as any of the other "Intelligent Flight Modes" - click the proper icon on the left, or push down on the 5D button under the remote, then tap the "TapFly" icon in the menu.
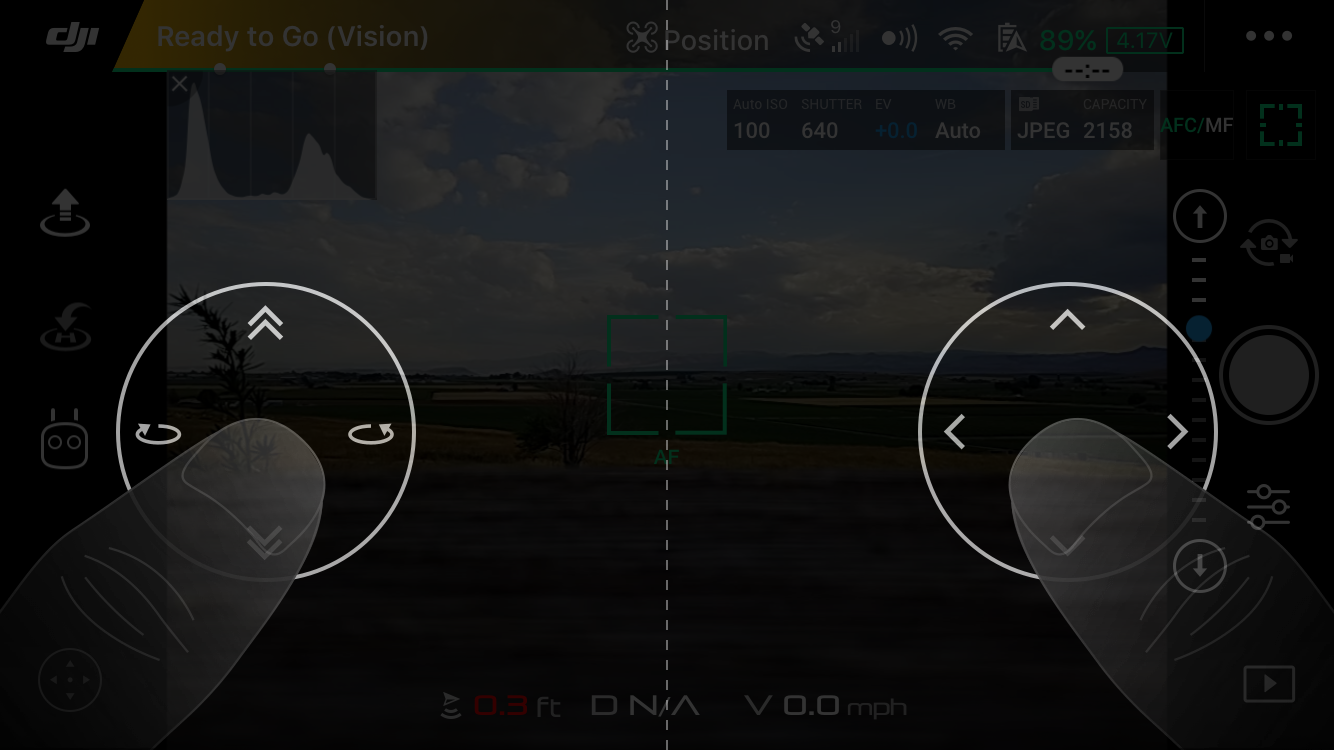
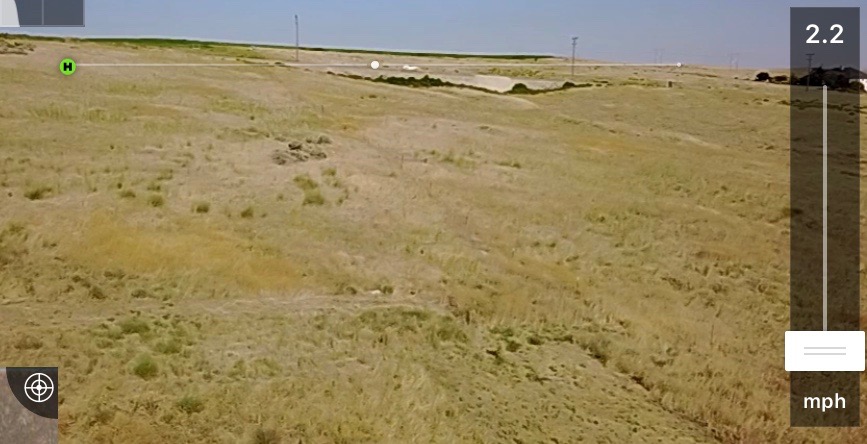
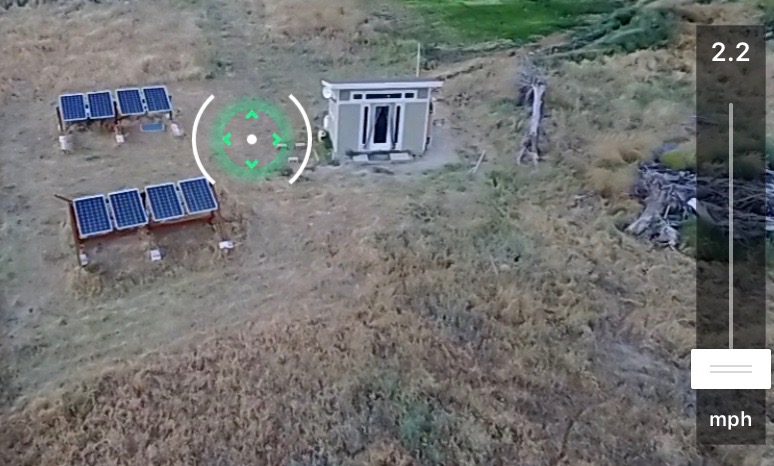
Once you've entered Tap to Fly, you'll see some indicator lines on the screen as you tilt the gimbal up and down, as well as a speed slider (which, predictably, sets the speed). The white line with a green "H" on the left is the horizon. Tap above this, the Mavic Pro will ascend. Tap below, it will descend.
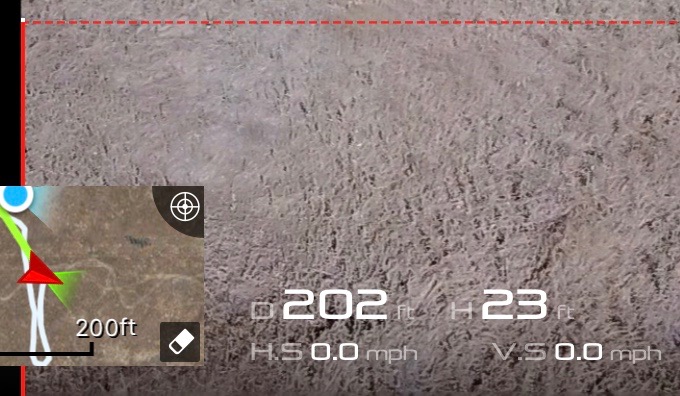
 Tilt the gimbal enough (either up or down), and you'll see a red dashed line (and a red indicator along the side of the screen). This is the upper or lower limit of where you can tap. It will simply refuse to fly above or below the acceptable range.
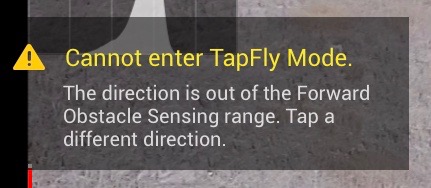
 The limitations are based on what the front facing obstacle sensors can deal with. This mode is crash-prone enough, so flying beyond the sensor angles is an even worse idea than usual.
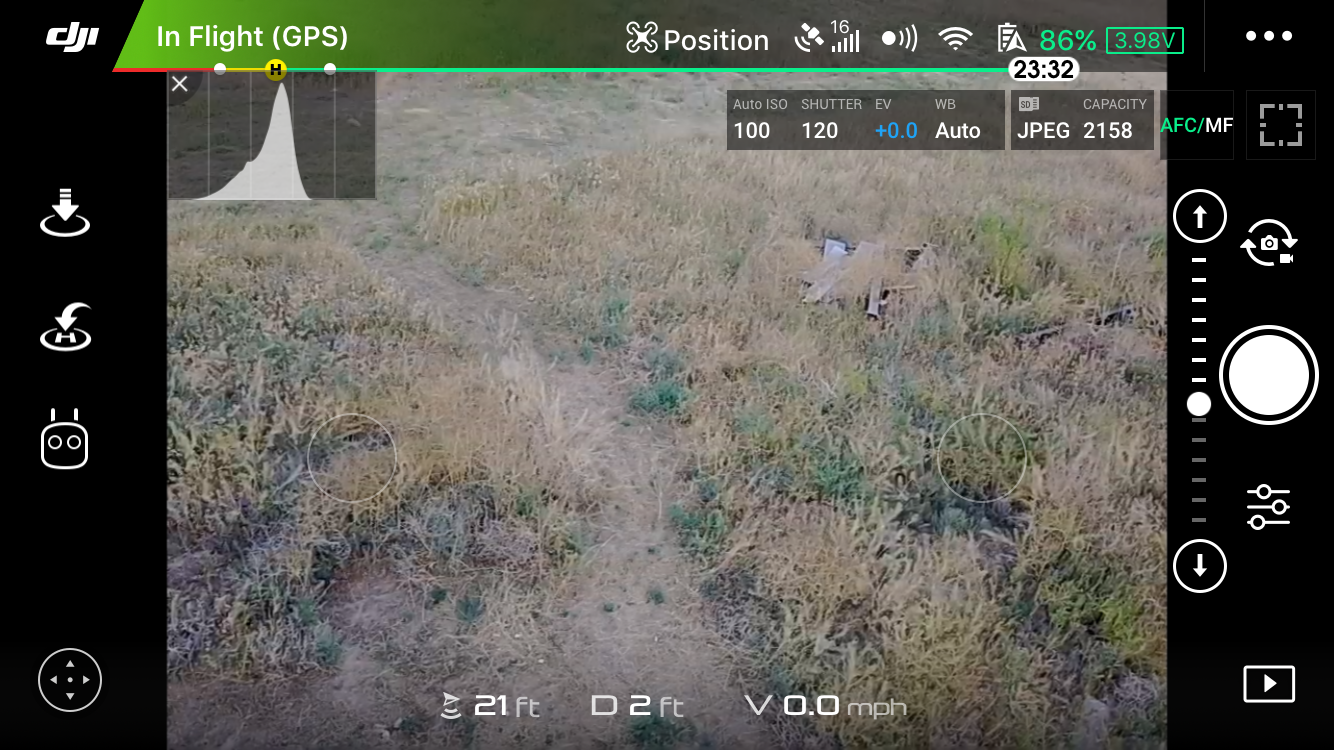
 Once going, you'll see a target indicating where the drone is attempting to fly, and a slider that controls the rate of travel. This is a recent change from the old system which had chevrons in the sky that were really fancy looking, but almost entirely useless.
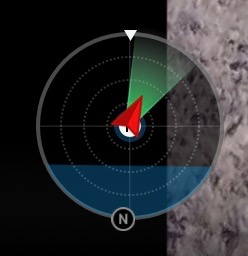
 Next, I turn left 90 degrees. Now I'm facing east (as seen relative to the "N" icon), and the Mavic Pro, still facing south, is shown as being facing my right - which it is. Note that the attitude indicator still shows a slight nose-up attitude - this is the "landed" attitude (and you'll notice when landing that the front gear touches slightly before the rear).

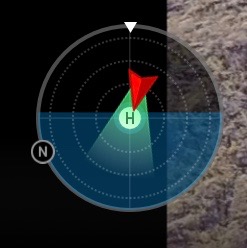
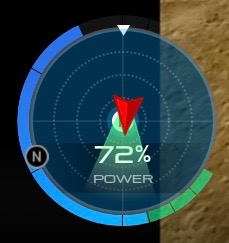
 One thing that's really obvious with the attitude indicator is just how much of a deck angle the Mavic Pro gets under hard acceleration or braking (here, pitched up for hard braking). It really rocks around! The gimbal will compensate for most of this, but it's still good to fly smoothly - and this is a great tool to see how smoothly you're flying the airframe. Smooth airframe, smooth video. I've seen the image jump a bit if the gimbal hits the limit stop, and that's no good in a bit of video.

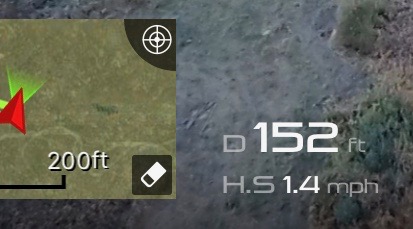
 It's worth noting that you can tap the "target" button on the mini video feed in map mode and fly with the map and atittude/orientation indicator up. But... what's that red line?
Why, it's the course lock line! If you're flying in one of the course locked modes ("Course Lock" or the Spotlight submode of Active Track), the Mavic Pro translates relative to the locked course. If you've got the map view up, it shows there as well and you can line up, but this makes it super easy to face the locked direction. If you're facing the locked direction, the translation commands work as expected - up will move the drone away from you, right and left move it the proper direction, and it's just easier to fly that way. Allowing you to easily orient yourself to the locked course is probably the best use of this instrument - otherwise, it's mostly showing data that doesn't really matter for flying.
 I haven't seen it hit 100% - but I regularly see 75-80% if I'm trying to accelerate and climb. Here's the thing - 100% is all well and good, as long as everything is working perfectly and the battery is factory-fresh. On an older battery, or if a connection is a bit loose, or any number of other problems, that 100% limit isn't going to work. Ask it to happen, there's a good chance the drone will lose power and fall out of the sky. That's "Bad."
In that I run my devices fairly conservatively (with the exception of Chinese power resistors), I'd suggest 50-60% as a reasonable "low battery maximum." If you've got a fully charged battery, go at it. But below 50% reported state of charge, I really wouldn't push the power limits that hard. The voltage is lower, which means more amps, which means more resistive losses, and it's just not a good idea. Yes. I know it will do it, most of the time, with a fairly new battery, but that doesn't make it wise.
Entering it is done the same as any of the other "Intelligent Flight Modes" - click the proper icon on the left, or push down on the 5D button under the remote, then tap the "TapFly" icon in the menu.
Once you've entered Tap to Fly, you'll see some indicator lines on the screen as you tilt the gimbal up and down, as well as a speed slider (which, predictably, sets the speed). The white line with a green "H" on the left is the horizon. Tap above this, the Mavic Pro will ascend. Tap below, it will descend.
 Tilt the gimbal enough (either up or down), and you'll see a red dashed line (and a red indicator along the side of the screen). This is the upper or lower limit of where you can tap. It will simply refuse to fly above or below the acceptable range.
The limitations are based on what the front facing obstacle sensors can deal with. This mode is crash-prone enough, so flying beyond the sensor angles is an even worse idea than usual.
Tilt the gimbal enough (either up or down), and you'll see a red dashed line (and a red indicator along the side of the screen). This is the upper or lower limit of where you can tap. It will simply refuse to fly above or below the acceptable range.
The limitations are based on what the front facing obstacle sensors can deal with. This mode is crash-prone enough, so flying beyond the sensor angles is an even worse idea than usual.
Tap to Fly Use
"Tap to Fly" isn't exactly what it's implied to be. It's not nearly as intelligent as one might hope, in terms of identifying a location and flying there. If you're hoping for "Active Track" level magic, you'll be disappointed. It's much closer to a lens angle and gimbal aware directional guide. The distance of your tap above or below the horizon line determines the angle of ascent or descent (mostly correlating to the screen), and how far left/right of center you tap determines the new course - it will slowly turn to that heading and head generally "that-a-way." Until you suggest it do something different, the obstacle detection kicks in, or the physics of "two objects trying to occupy one space" kicks in.
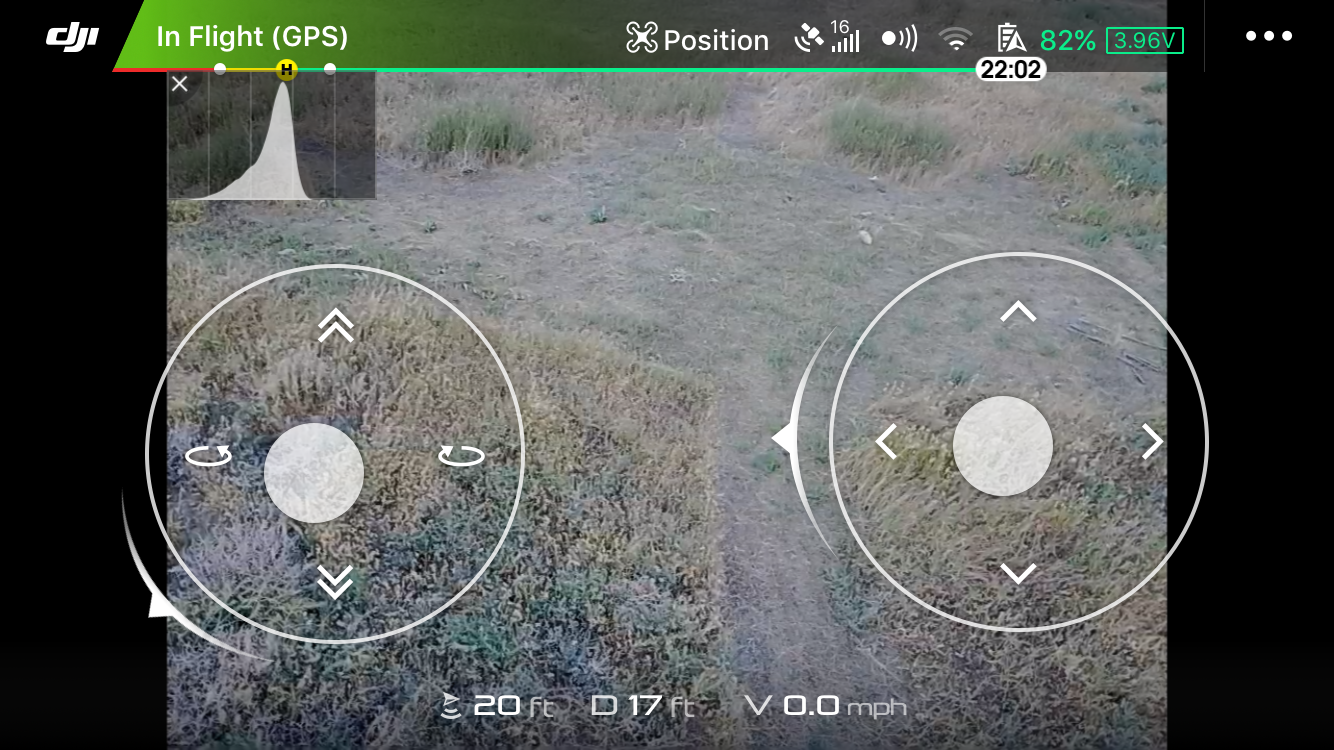
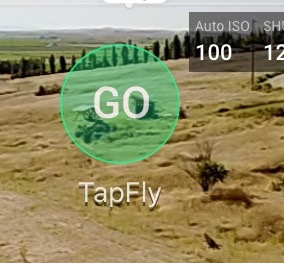
Once you're in Tap to Fly mode, tap the screen. You'll get a green circle in the general area you tapped asking for confirmation. Tap again to confirm, and your drone will head off in that direction.
Once you're in Tap to Fly mode, tap the screen. You'll get a green circle in the general area you tapped asking for confirmation. Tap again to confirm, and your drone will head off in that direction.
Once going, you'll see a target indicating where the drone is attempting to fly, and a slider that controls the rate of travel. This is a recent change from the old system which had chevrons in the sky that were really fancy looking, but almost entirely useless.
While you're in Tap to Fly mode, the speed slider on the right controls the current speed - and if you set it up high, your drone will head off in quite the hurry. I don't suggest doing that unless the sky is really, really free of obstacles.
The flight controls operate in a modified mode, but still work. Everything is slowed down relative to the Tap to Fly speed, so don't expect rapid responses. Altitude and yaw requests work as normal, moving the aim point around. Left and right translate still slide side to side, but forward and reverse translate are a bit different. Forward will speed you along the course, and reverse will slow you down. However, if you hold reverse all the way back, it will cancel Tap to Fly and leave you hovering. Finally, to cancel, you can hold the "Pause" button on the remote, tap the red X on the left side of the screen, or hold a second or so of "full back translate" stick.
I've found one use for this mode: Slow zoom into a particular target on the ground. Start away from the target and high, tap the target, and you can maintain a slow visual zoom automatically. However, you may find yourself fighting with obstacle detection (for some reason, it seems overly aggressive in this mode), and instead of heading to the target, head to the horizon. You can't fly without obstacle detection enabled for reasonable enough reasons, so, perhaps, use waypoints if you're having trouble with this.
I suppose it's sort of neat to tap around on the screen and fly your drone, but... eh. You have a remote. Use it. It's way more precise.
The Attitude and Orientation Indicator
Did you know that the DJI Go app has an attitude indicator available? It does! And, on top of that, it shows the relative orientation of the remote and the drone! Why would you need this? Winds aloft, for one. And finding your drone again if you've mistakenly lost visual contact with it. Plus, it's a great tool to use for that whole "being smooth" thing I talk about. It's really obvious if the drone "flips" when it comes to a stop.
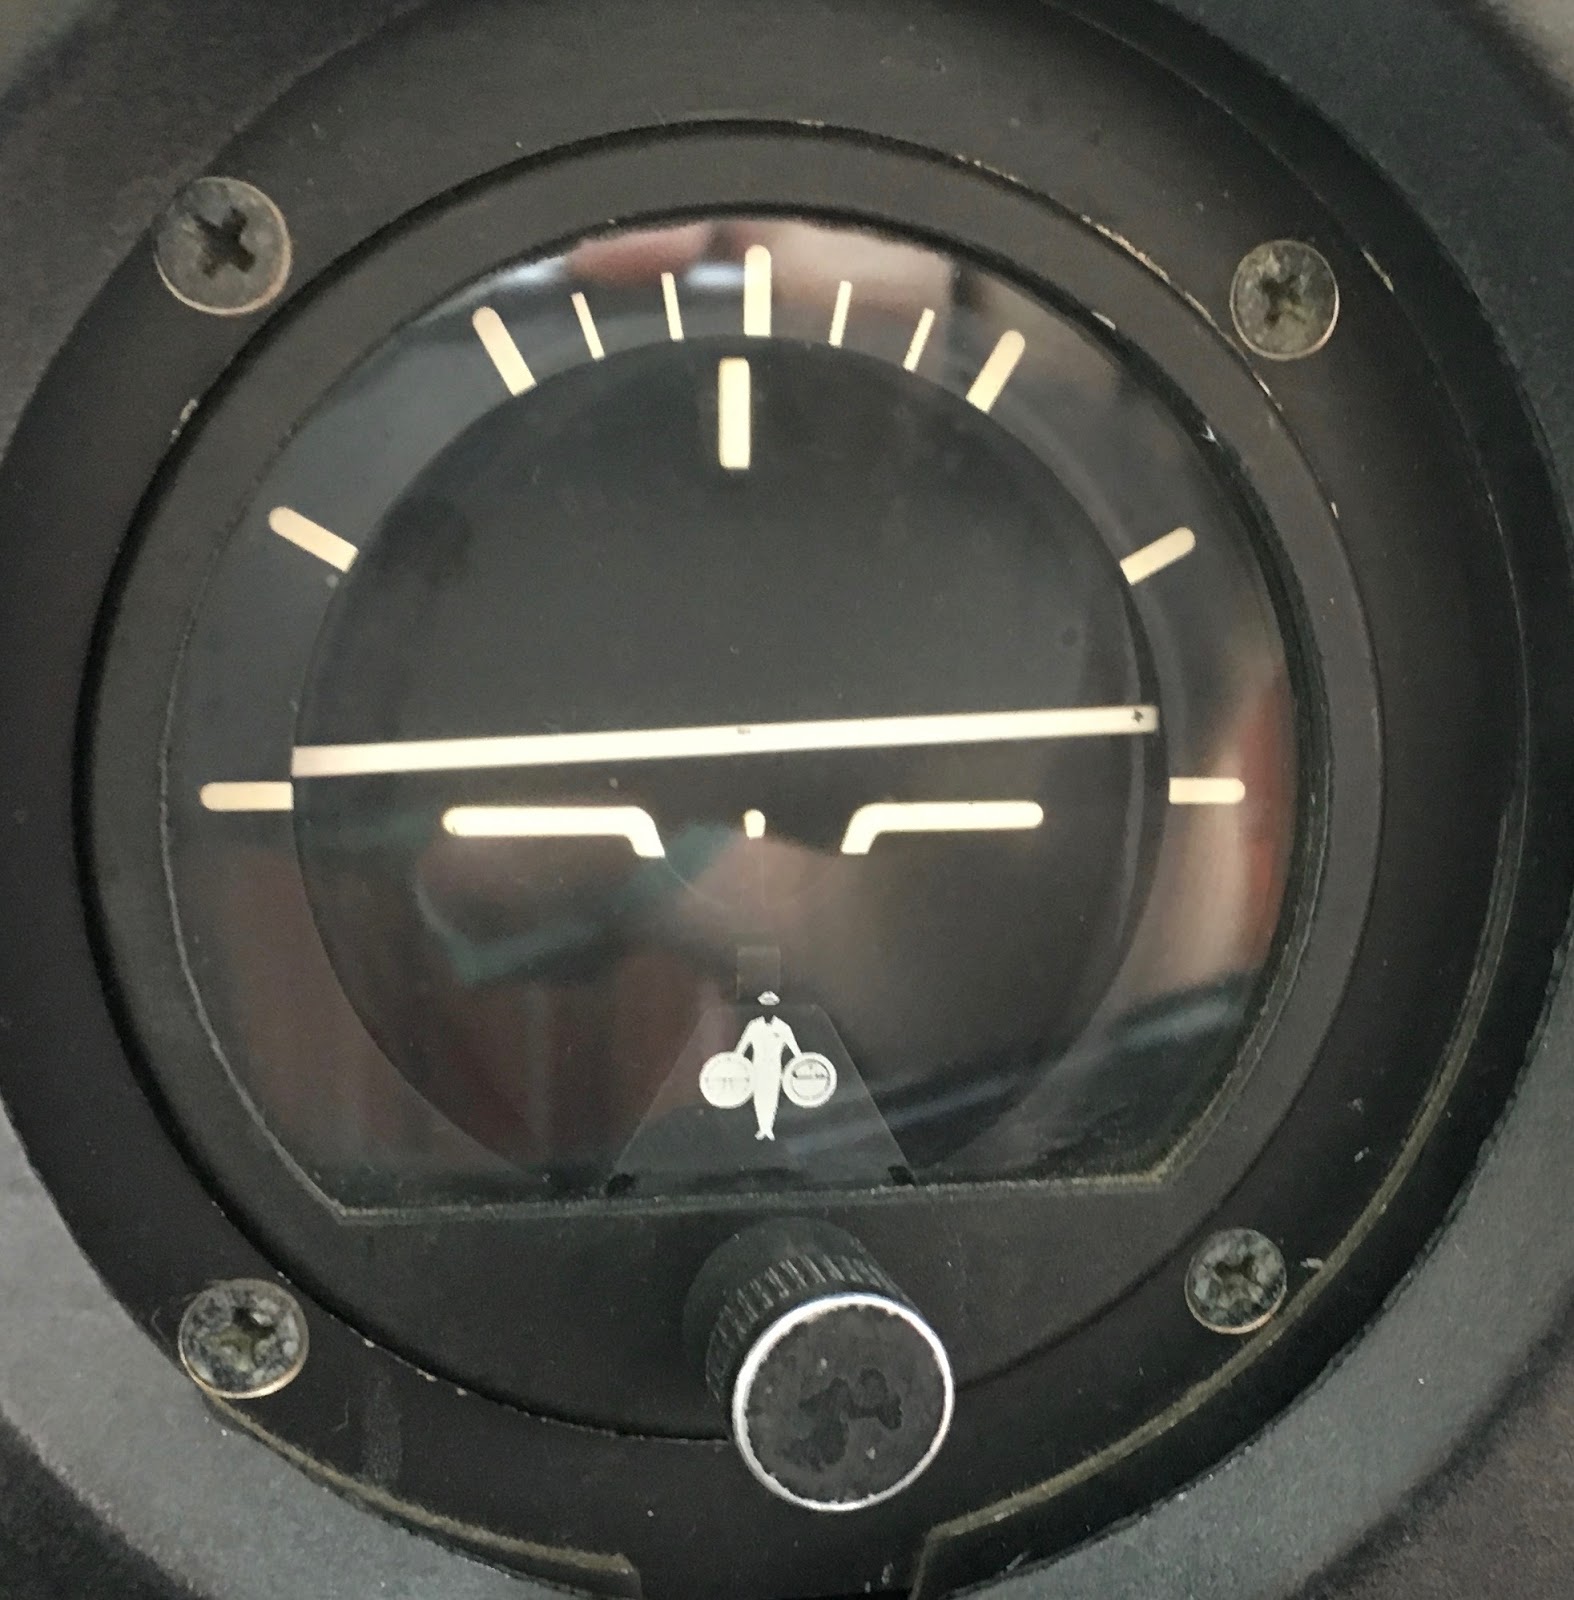
Anyway - what, exactly is an attitude indicator? Well, one of these things! This is a genuine, certified, bona-fide attitude indicator from a half-century old Cessna 182 (52 years at the time of posting) - and it still works! Though it may have been rebuilt once or twice. This fancy instrument shows the attitude of an aircraft - pitch and roll relative to the horizon. Why do you need to know this? It's rather helpful if you're in clouds or otherwise can't see the ground (or if the ground happens to be slanted such that you get some weird visual illusions - the instruments are right more often than your inner ear is).

And the Mavic Pro can display one of these as well - in a rather fancy little display that includes more information as well. How do you enable this little-known display?
Take a look at the top right of the map display (or the image display, if you've got the map up). You'll see a rather bizarre looking icon that looks like a World War I gunsight. Tap it, and the mini display is replaced with the attitude and orientation indicator!

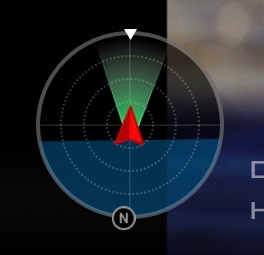
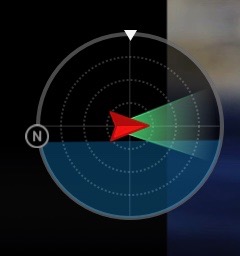
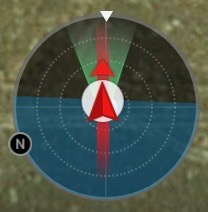
If all has gone well, you'll see the attitude and orientation indicator replace the mini map. There are a few symbols worth mentioning. The first is the white triangle at the top. This indicates the orientation of you - the pilot. And it's always at the top. The aircraft indicator rotates relative to you in this instrument. The "N" icon around the outside indicates north (magnetic or true - I'm not actually sure which). The airplane icon (the red triangle) is always oriented relative to the remote control orientation. Finally, the blue shaded section indicates the horizon. The horizontal line in the center indicates level. If it seems like the Mavic Pro sits a tiny bit nose up on the landing gear - the attitude indicator agrees!
The attitude indicator uses the blue shaded section as the ground. If the horizontal line in the center is above the horizon, the nose is angled up. If below, the nose is angled down. And if the horizon is tilted, the Mavic Pro is tilted relative to the horizon. Fly with it a bit and you'll figure it out - I'm so used to reading attitude indicators that it's slightly difficult to describe how to interpret it, but it's really obvious in use.
In this image, I'm standing right next to the Mavic Pro (which is sitting on level ground), and the Mavic Pro and I are both facing more or less south.
Next, I turn left 90 degrees. Now I'm facing east (as seen relative to the "N" icon), and the Mavic Pro, still facing south, is shown as being facing my right - which it is. Note that the attitude indicator still shows a slight nose-up attitude - this is the "landed" attitude (and you'll notice when landing that the front gear touches slightly before the rear).
Once in the air, the horizon will show level - if the Mavic Pro is level. Normally, it won't be - holding a position relative to the ground with any wind will require some deck angle one way or another. The "most nose down" direction is facing directly into the wind, if you're curious. As you fly away from the remote, the icon will shift relative to the center "H" circle ("Home"). As you rotate, the relative position changes. So, with the drone icon lined up with the white triangle at the top, you're facing the drone! If the drone icon is facing the center, it's facing you.
One thing that's really obvious with the attitude indicator is just how much of a deck angle the Mavic Pro gets under hard acceleration or braking (here, pitched up for hard braking). It really rocks around! The gimbal will compensate for most of this, but it's still good to fly smoothly - and this is a great tool to see how smoothly you're flying the airframe. Smooth airframe, smooth video. I've seen the image jump a bit if the gimbal hits the limit stop, and that's no good in a bit of video.
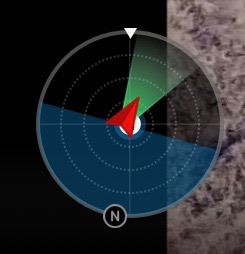
Bank is indicated as well as pitch. Remember, the lower blue section shows the horizon, so the Mavic Pro is banked left here (it's a lot easier to work out while you're flying).
It's worth noting that you can tap the "target" button on the mini video feed in map mode and fly with the map and atittude/orientation indicator up. But... what's that red line?Why, it's the course lock line! If you're flying in one of the course locked modes ("Course Lock" or the Spotlight submode of Active Track), the Mavic Pro translates relative to the locked course. If you've got the map view up, it shows there as well and you can line up, but this makes it super easy to face the locked direction. If you're facing the locked direction, the translation commands work as expected - up will move the drone away from you, right and left move it the proper direction, and it's just easier to fly that way. Allowing you to easily orient yourself to the locked course is probably the best use of this instrument - otherwise, it's mostly showing data that doesn't really matter for flying.

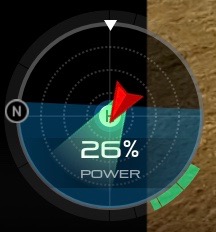
And, finally, if you're in Sport Mode, you get some additional bonus data in the attitude indicator - a power output meter wrapped around the edge! If you wonder how hard you're pushing the drone in sport mode, this is a really, really good thing to know about.
I haven't seen it hit 100% - but I regularly see 75-80% if I'm trying to accelerate and climb. Here's the thing - 100% is all well and good, as long as everything is working perfectly and the battery is factory-fresh. On an older battery, or if a connection is a bit loose, or any number of other problems, that 100% limit isn't going to work. Ask it to happen, there's a good chance the drone will lose power and fall out of the sky. That's "Bad."In that I run my devices fairly conservatively (with the exception of Chinese power resistors), I'd suggest 50-60% as a reasonable "low battery maximum." If you've got a fully charged battery, go at it. But below 50% reported state of charge, I really wouldn't push the power limits that hard. The voltage is lower, which means more amps, which means more resistive losses, and it's just not a good idea. Yes. I know it will do it, most of the time, with a fairly new battery, but that doesn't make it wise.

Point of Interest
Point of Interest is an automatic mode that circles around a particular point while automatically adjusting the heading to keep the camera aimed at the point (ideally, a point you're interested in). This mode is a bit of a cliché in 2017 - an awful lot of drone footage at this point involves using DJI's "Point of Interest" mode and letting the drone film. However, it's a useful mode, and makes things like 3D mapping structures (as a feed into Drone Deploy) quite easy!
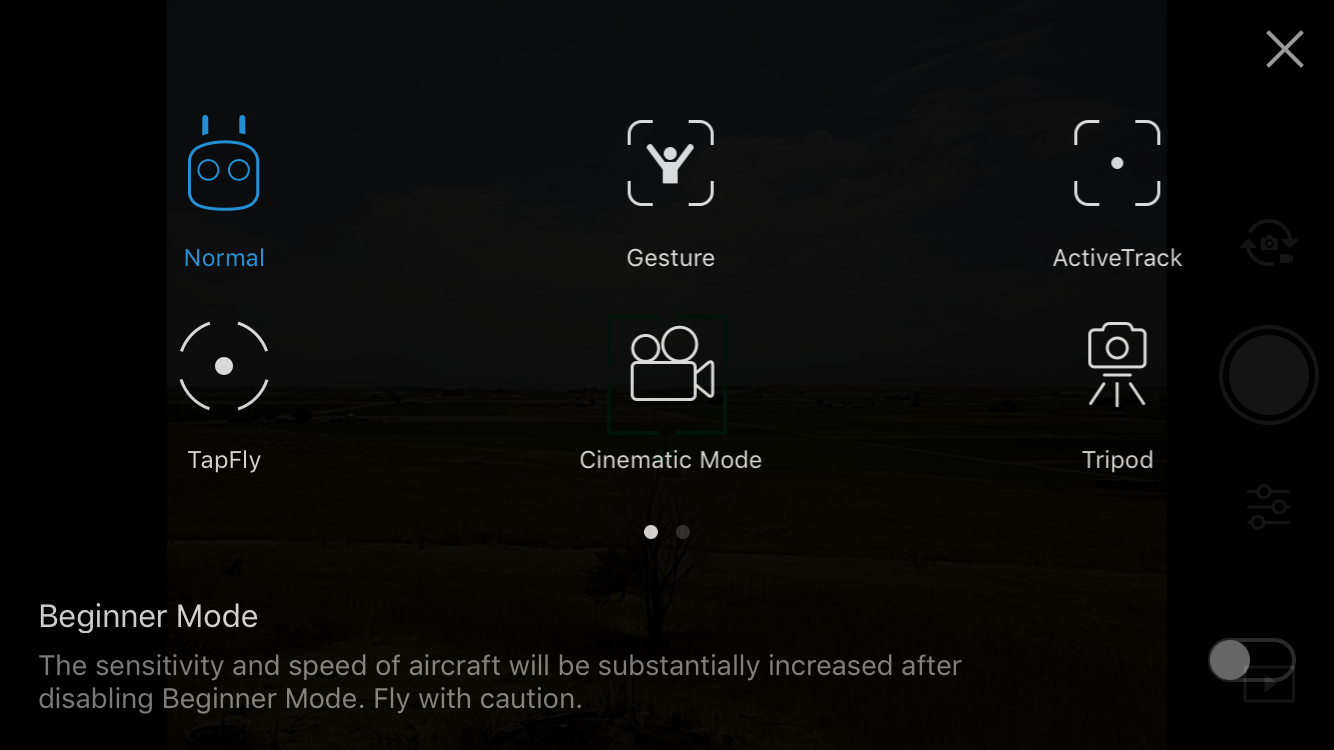
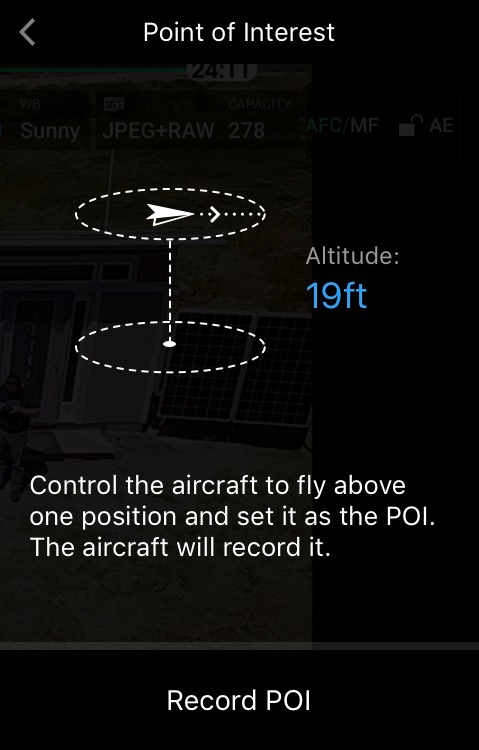
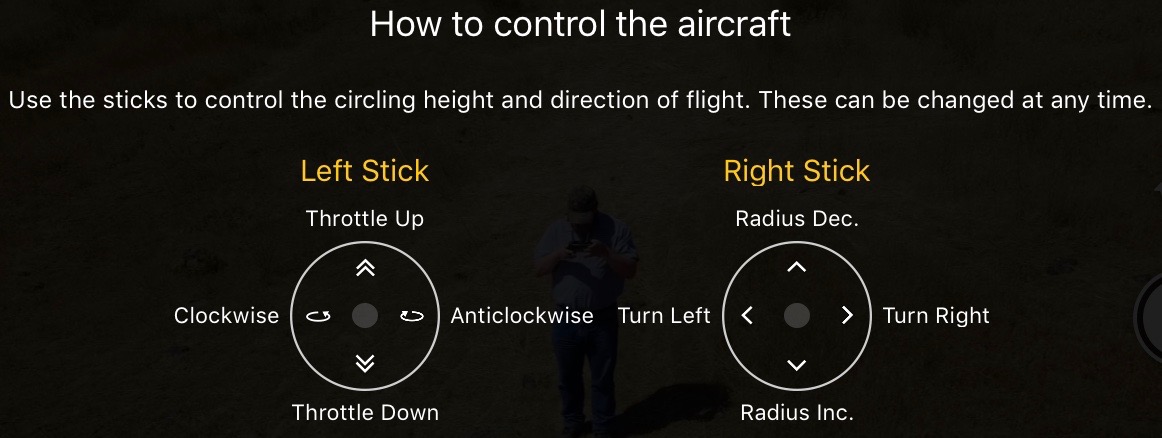
Since this is another Intelligent Flight Mode, entry is the same as normal - tap the icon on the left or push in on the 5D button, swipe over, and select Point of Interest. If you haven't turned off the notification, you'll get a helpful guide of the controls and how they work in PoI mode. Unfortunately, this guide is wrong. I'll cover the actual controls below. PoI requires GPS, so if you don't have a GPS lock, this mode won't work.
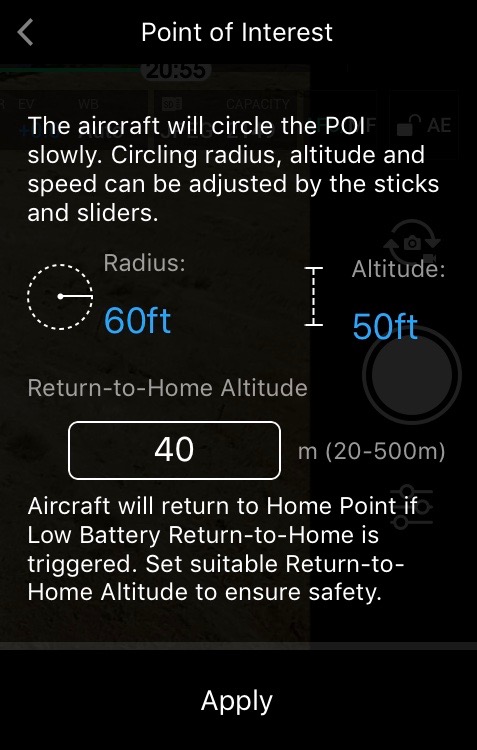
Clear this incorrect control guide, and you'll see the initial Point of Interest slider on the right. This prompts you to go fly directly above whatever point you're interested in - there's no way to set the point on the map or any way except literally going there in the sky. The altitude doesn't matter - it can be changed later.
When you're where you want to be (pointing the camera straight down can help identify the point), tap "Record POI" and you'll go onto the next screen.
 Once the actual PoI is recorded, back away from it. The radius readout will be red if you're too close - there's a lower limit on the useful radius. Also double check the return to home altitude for your area. Back out to your desired radius and altitude, then tap "Apply" to start circling!
Obstacle detection is disabled in PoI mode! The drone is circling sideways, so make sure it won't hit anything! One nice feature in this mode is that, with the drone doing the flying, you don't have much to do but keep your eyes on it.
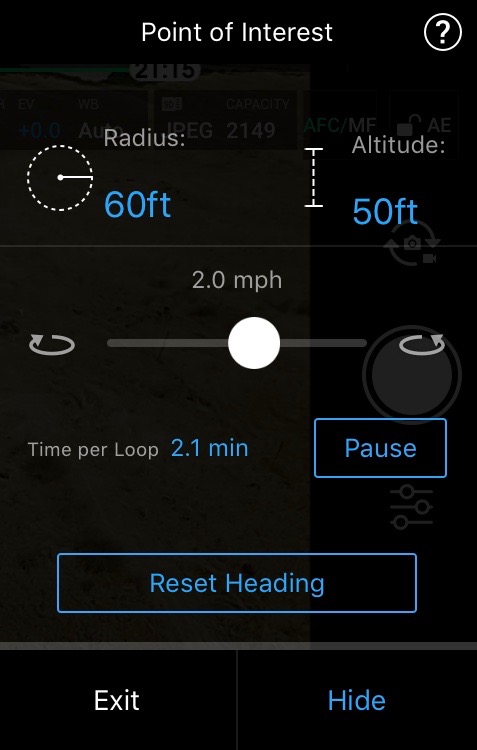
 Once POI mode is engaged, you'll get this screen, and the drone will begin circling. The slider in the center sets the speed of rotation (defaulting to 2.0 mph to the right), the time per loop is calculated, and the current altitude and radius are shown. The "Pause" button does exactly what you think - it pauses the circling (tapping the physical pause button will accomplish the same thing). "Reset Heading" will yaw the drone back around to face the center of the orbit.
While the circling speed can be set up as high as 15mph, the drone struggles to hold the radius at high speed. It is quite likely to drift out if you try this - I'd suggest that if you want a fast circle, recording it slow (2-5mph) and speeding it up in post production is the way to go here.
 The altitude control works normally - push up to ascend, pull down to descend. The gimbal will not automatically follow if you do this - you'll have to re-aim manually.
The yaw control (left stick, by default) will yaw the drone around - but this is an offset to the point of interest. If you yaw left 90 degrees, it will always point 90 degrees to the left of the point of interest. If you spin it around 180 degrees, it will always point directly away from the center of the circle. The "Reset Heading" button in the right pane will yaw the Mavic Pro back around to point to the center.
Forward and backwards translation requests (normally the right stick up and down) will increase and decrease the radius of circling - no matter which way the Mavic Pro is pointing. If the drone is pointing at the center of the circle, they work normally, but if it's pointing any other direction, they still adjust the radius.
And, finally, left/right translation requests stack on top of the current base speed (set with the slider) to move the drone around the circle. Push right, it moves right around the circle (counterclockwise), and left will move it left (clockwise). Again, these are independent of the direction the Mavic Pro is facing, but work more or less normally when pointing at the center of the circle.
Exiting PoI mode is pretty much the same as any other mode. Tap "Exit" on the slider, hit the red "X" on the left side of the screen, or hold the physical pause button on the controller.


![]()
![]()
Since this is another Intelligent Flight Mode, entry is the same as normal - tap the icon on the left or push in on the 5D button, swipe over, and select Point of Interest. If you haven't turned off the notification, you'll get a helpful guide of the controls and how they work in PoI mode. Unfortunately, this guide is wrong. I'll cover the actual controls below. PoI requires GPS, so if you don't have a GPS lock, this mode won't work.
Clear this incorrect control guide, and you'll see the initial Point of Interest slider on the right. This prompts you to go fly directly above whatever point you're interested in - there's no way to set the point on the map or any way except literally going there in the sky. The altitude doesn't matter - it can be changed later.
When you're where you want to be (pointing the camera straight down can help identify the point), tap "Record POI" and you'll go onto the next screen.
Once the actual PoI is recorded, back away from it. The radius readout will be red if you're too close - there's a lower limit on the useful radius. Also double check the return to home altitude for your area. Back out to your desired radius and altitude, then tap "Apply" to start circling!Obstacle detection is disabled in PoI mode! The drone is circling sideways, so make sure it won't hit anything! One nice feature in this mode is that, with the drone doing the flying, you don't have much to do but keep your eyes on it.
Once POI mode is engaged, you'll get this screen, and the drone will begin circling. The slider in the center sets the speed of rotation (defaulting to 2.0 mph to the right), the time per loop is calculated, and the current altitude and radius are shown. The "Pause" button does exactly what you think - it pauses the circling (tapping the physical pause button will accomplish the same thing). "Reset Heading" will yaw the drone back around to face the center of the orbit.While the circling speed can be set up as high as 15mph, the drone struggles to hold the radius at high speed. It is quite likely to drift out if you try this - I'd suggest that if you want a fast circle, recording it slow (2-5mph) and speeding it up in post production is the way to go here.

Point of Interest Controls
While you're in PoI mode, the helpful cheat sheet is wrong (at least for Mode 2, the default control mapping). The left and right stick "left and right" directions are swapped between the two sticks. DJI's Quality Control at work...
The altitude control works normally - push up to ascend, pull down to descend. The gimbal will not automatically follow if you do this - you'll have to re-aim manually.The yaw control (left stick, by default) will yaw the drone around - but this is an offset to the point of interest. If you yaw left 90 degrees, it will always point 90 degrees to the left of the point of interest. If you spin it around 180 degrees, it will always point directly away from the center of the circle. The "Reset Heading" button in the right pane will yaw the Mavic Pro back around to point to the center.
Forward and backwards translation requests (normally the right stick up and down) will increase and decrease the radius of circling - no matter which way the Mavic Pro is pointing. If the drone is pointing at the center of the circle, they work normally, but if it's pointing any other direction, they still adjust the radius.
And, finally, left/right translation requests stack on top of the current base speed (set with the slider) to move the drone around the circle. Push right, it moves right around the circle (counterclockwise), and left will move it left (clockwise). Again, these are independent of the direction the Mavic Pro is facing, but work more or less normally when pointing at the center of the circle.
Exiting PoI mode is pretty much the same as any other mode. Tap "Exit" on the slider, hit the red "X" on the left side of the screen, or hold the physical pause button on the controller.
Point of Interest Map View
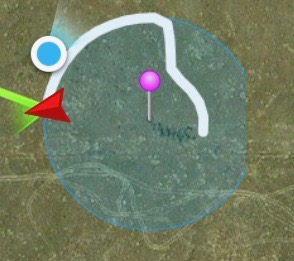
For PoI flights, map view is quite useful as it shows the path flown and, most of the time, the intended path of flight. If all is working properly (which... often it isn't), a blue circle will indicate the current radius of flight. Sometimes this circle isn't drawn properly (the right side is missing here), but you can often see at least some of it. The orientation is visible here as well - the drone is facing away from the center of the circle. It's useful for checking on the location and status in flight.

Atti & Opti Modes
If the Mavic Pro can't get a GPS lock, it will fall back to "ATTI" or "OPTI" flight modes. This is normally a bad thing if you're not expecting it, but just in case, I'm discussing them.
"OPTI" means that there's no GPS lock, but the ground sensing system can find the ground and stabilize the hover. In this mode, altitude is normally limited to about 10 feet - it's a low altitude mode. This is also likely the mode you'll find yourself in when flying inside (but, seriously, you shouldn't be flying the Mavic Pro inside).
"ATTI" means that there's no GPS lock, and there's no optical stabilization. You know those cheap quadcopters that drift with the wind? Congratulations, you're flying one of those. Unfortunately, there's no way to force the Mavic Pro into this mode for practice - so... good luck. Landing immediately and accepting that there will probably be prop damage is a good option here. This shouldn't happen in flight unless something is seriously wrong with GPS.
Planetary K-Index
What could go seriously wrong with GPS? Well, there's the Planetary K-Index (also seen as "KP Index")...
This is a rating of the current geomagnetic storm activity. From the site, "The principal users affected by geomagnetic storms are the electrical power grid, spacecraft operations, users of radio signals that reflect off of or pass through the ionosphere, and observers of the aurora." That means GPS users - those signals go through the ionosphere.
Is this actually likely to be an issue? Probably not, but the Mavic Pro seems a bit more sensitive to this than some other drones. If it seems like it's taking a long time to lock onto satellites, or is wobbling around a bit more in hover, this could be related. Or it could just be windy. I mention this for completeness, since it's a term you'll see tossed around a lot.
DJI Go Swipes
And, finally, did you know that you can put the DJI Go app into a full screen mode, and have quick access to useful shortcuts? You can!
Swipe up or down on the screen and the app will enter full screen mode. This gets you the full screen space for the image, but also gets rid of all the instrumentation, so I can't say I recommend it.
Swiping left gets you a much more useful set of toggles - rotating the camera between portrait and landscape modes, flipping the gimbal straight down or to the horizon, setting the home points, and adjusting your display brightness.

Final Thoughts
Personally, I don't use these modes that much. Point of Interest is somewhat useful, but Tap to Fly and Fixed Wing Mode both feel like toys to me - I can come up with some use cases, but I'm stretching.
The Attitude & Orientation indicator is amazingly useful, especially in course lock modes - and being able to see power delivered in Sport Mode is helpful to avoid overstressing things on a low battery.
And Point of Interest will let you capture "Drone around a point" videos without having to hand-fly them!
Next week, I'll finish this series up with a comprehensive list of menu configuration options - but this week finishes out the flight modes!
And Point of Interest will let you capture "Drone around a point" videos without having to hand-fly them!
Next week, I'll finish this series up with a comprehensive list of menu configuration options - but this week finishes out the flight modes!
4 comments:

Posts by Category
- Antique Cars (2)
- Arduino (14)
- Automotive (4)
- Basalt (1)
- Battery Packs (27)
- Battery Testers (6)
- Battery Testing (9)
- Bicycle Parts (6)
- BionX (14)
- Builds (26)
- Cell Phones (4)
- Drones (7)
- Electric Bikes (21)
- Electric Vehicles (13)
- Electronics (22)
- Engines (4)
- Heating and Cooling (3)
- Home Improvement (4)
- Homesteading (11)
- Lights (9)
- Motorcycles (5)
- Raspberry Pi (2)
- Research (13)
- Reverse Engineering (1)
- Rural Ruin (1)
- Self Driving Cars (1)
- Solar Shed (22)
- Spot Welders (6)
- Teardowns (23)
- Tesla (4)
- Tool Batteries (8)
- Tractors (4)
- Wireless (3)
Follow by Email
Other posts you might find interesting

I have a Sunkko 788+ Spot Welder. It failed on me rather quickly, either from a faulty triac, or from…
Winter is coming. This means dark evening commutes, and a lot of biking in the rain. And that, of…
It's been oddly sunny and warm in Seattle this week - it was 60F yesterday - in February! And I've…
Sunkko 788+ Battery Spot WelderSo you've got one of these, and know very little about it. That's great!…
Contact Russell (based in the United States)
Name
Email *
Message *
Email *
Message *
PayPal Donation
If you find my posts useful, feel free to toss a bit in the tip jar! It's likely to go to some cheap gizmo or another to play with and over-analyze, and I do take requests!